|
Age 12-14
Art Activities
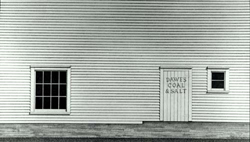 Coal and Salt (1970) is an interesting image that
has fun with the words "coal" and "salt." Imagine holding salt in one hand
and coal in the other. The two would appear the opposite of one another
in both colour and texture.
Coal and Salt (1970) is an interesting image that
has fun with the words "coal" and "salt." Imagine holding salt in one hand
and coal in the other. The two would appear the opposite of one another
in both colour and texture.
Idiomatic Illustrations
Idiomatic expressions are unique phrases that say one thing but mean something
else. Make a picture that shows what the phrase is literally saying.
Materials:
Directions:
1. Add other idiomatic phrases to this list:
· Your eyes are bigger
than your stomach
· It's raining cats and dogs
· You're
the apple of my eye
· I'm so hungry I could eat a horse
2. Select one or two phrases and try to illustrate them. Use a pencil
to complete your drawing, and then go over your pencil drawing with a
thin, black marker. Colour with crayon if you wish.
3. When you are finished, see if someone can guess your idiomatic phrase
just by looking at the picture.
Stained Glass Window
Design a stained paper window that will stop someone's gaze from looking
out the window.
Materials:
· 1 piece card stock (8" X 8")
· Vegetable oil in a small bowl
· Paint brush (no. 12 flat bristle)
Directions:
1. Use the pencil to design an outline of your stained paper image on
the piece of card stock. You could also fold the card stock into quarters
and then use your scissors to cut the design as if you were making a cutout
snowflake. As you cut, periodically hold your card stock up to a window
to make sure the cutout image is looking the way you want it to look.
The cutout sections will become the stained paper parts.
2. After you have finished completing your design, choose from the colours
of tissue paper and decide what colour you want to use to cover the cutout
sections in your card stock. Cut the tissue paper to size and glue into
place.
3. When you have filled in the cutout image with coloured tissue paper,
dip the paintbrush into the small bowl of vegetable oil. You do not need
a lot of oil to make the tissue paper transparent. It is a good idea to
practice on scraps of tissue paper before you begin to apply oil to your
image.
4. Attach the transparent string to the upper corners of your stained
paper image and suspend it in the window from the thumbtack. If you do
not want to suspend it, you can lay it against the window by propping
it on the sill.
Window Portraits
Materials:
· Newspaper, sponges, water, brushes
· 2 drops of liquid dish detergent
Directions:
1. Ask student models to stand in front of windows where they can be viewed
by the students in the classroom.
2. Cover the floor or counter space directly in front of each window with
newspaper and equip each artist with a paper cup of black tempera, a thin
brush, and a sponge. Liquid detergent should be stirred into the tempera
paint for two reasons: (1) to help the paint adhere to the surface of
the window, and (2) to simplify the cleanup of any paints that may spill.
Please note that too much liquid detergent may make the paint crackle
and blister after it dries, so add detergent sparingly.
3. Ask your models to freeze in one position. (Having them stare at a
fixed point will help them to remain still.) Start outlining your model
with black paint; follow the lines of the face, hair, and clothing. Pretend
you are tracing a photograph; this may help you find your outlines.
4. If you make a mistake, it is very simple to correct it by wiping it
away carefully with a slightly damp sponge. Dry the area with a paper
towel and start again.
5. When you have finished outlining, remember to thank your model. You
can paint in your person when your black outlines are dry, but you do
not need a model for this step.
6. At different times of the year, you may wish to add or subtract clothing
(hat, gloves, coats, and so forth) according to the weather.
Simple Egg Tempera Emulsion
 Egg tempera emulsion
is a permanent paint with an opaque finish. It is water-soluble so you can
use water to thin your emulsion and to clean your brushes. Egg tempera emulsion
is a permanent paint with an opaque finish. It is water-soluble so you can
use water to thin your emulsion and to clean your brushes.
This emulsion is very useful when you want to paint one colour over another.
Try not to be wasteful - mix as much pigment as you will use at one time.
The emulsion will keep however for a few days if you store it in an airtight
jar in the refrigerator.
Materials:
· Assorted powdered pigments or poster colours
How to make it:
1. Place the egg yolks in a measuring cup and break the yolks. Determine
the amount of water you will need by dividing in half the measurement
of your egg yolks. The relation is 2 to 1 which means, if you have 2 tablespoons
of egg yolk, you will need one tablespoon of water.
2. Do not beat but mix egg yolks and water thoroughly until well blended.
3. Mix a small amount of egg mixture with each powdered pigment. Work
with brush in a palette pan until thoroughly mixed.
Make your own sketchbook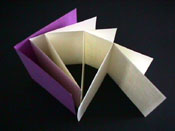
Materials:
· Cardstock or equally strong material for your book cover
· Paper cut to size (amount depends on how many pages you want in your
book)
· Hammer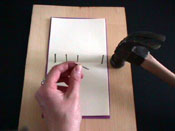
· Scrap of wood to protect the top of your worktable
· Needle and strong (quilting) thread
Directions:
1. Cut pages and book cover to size. Fold in half.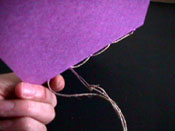
2. Punch five holes through the middle fold.
3. Bring your needle with thread up through the third (middle) hole first,
weave down through the second hole, and up through the first hole.
4. Weave back through the holes to the fifth (last hole). Sew your way
to the third hole again.
5. Pull thread tightly and knot with the other end of thread.
6. Cut off excess thread. You should have a neat, strong binding. This
is a one-signature book.
Bake a Memory
Does the taste of bakeapple jam remind you of your grandmother? What does
the smell of freshly baked bread do for you? Try to remember a particular cooking or baking smell
 that triggers fond memories for you. Then, bake it yourself!
There is a really good feeling when you pick your own berries and make your
own jam or tart, especially if it reminds you of a person you know well
who is no longer around you. Ask someone else, like your mom or big brother
to share the baking or cooking with you and take time to reminisce and share
your memories about the person you associate with the baking treat.
Monoprinting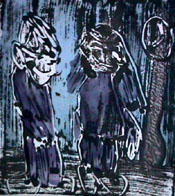
Unlike other forms of printing that Christopher Pratt practices (etching
and lithography) monoprinting is a means of producing a single print of
an image. It is not a complicated process and there is little equipment
required.
Materials:
· Tempera paint any colours
· Paintbrushes of varying widths
· Plexi-glass plates cut to any size
· Drawing objects (sticks, q-tips, rag, sponge)
· Rags and a cup for water for cleaning brushes  Directions:
1. Cover plexi-glass plate with an even layer of tempera paint.
2. Draw in this layer with finger, brush, etc. or wipe away paint with
rag or sponge to produce negative space (places where paper will show).
3. Carefully press a sheet of paper down on to the plate and rub gently
with the back of fingers. Do not press too hard and squash the image!.
4. Lift paper when you have rubbed the whole image area. The print will be a reverse of the
original image on the plexi-glass plate. If you do not spell words or your name backwards on the
plate, it will print backwards on the paper.
return to You Try
return to Age 12-14
|


