|
Age
15-17+
Art
Activities:
Facial Proportions
Materials: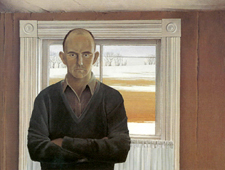 Directions:
1. Begin by drawing a large oval to represent the head.
2. Measure the length of your oval and draw a horizontal line at the
halfway point. This line is where the eyes will be drawn.
3. Divide the length of the line into five equal sections. Your eyes,
if you haven't noticed before now, are one eye distance apart from each
other. Use your finger and thumb to measure one eye length. Place this
measured distance between both your eyes. What does it tell you?
4. From the middle of the eye line, imagine a vertical line that extends
from the top of the forehead down to the curvature of the chin. Refer
to this imaginary line as the central axis. The central axis will tilt
in the direction the head tilts.
5. The middle point on the central axis, between the eye line and the
bottom of the chin is the area where the tip of the nose is. Look closely
at the widest part of your nostrils. How do they line up with the corners
of your eyes?
6. The halfway point between the tip of your nose and the chin is the general area
where your lips meet.
7. Fill in your eyebrows, hair, and ears if you can see them.
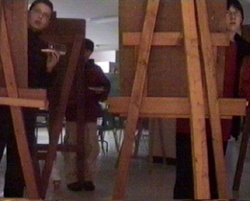
Action Figures
An easy approach to learn how to draw a person is to think of their body
as a series of simple shapes joined together. A field trip to a gym class
would be a helpful activity to include in this project.
Materials:
Directions:
1. Ask someone to be your art model. Have them pretend to be a spy and
to move as if they are sneaking on the tip of their toes, and then say
“freeze!" Give them time to find a comfortable position that
looks similar to the active stance you made them freeze in.
2. Since it is very difficult for the model to hold a pose for a long
time, you will have to sketch quickly.
3. Start sketching a stick figure version of your model. The only details
necessary to include at this point is the direction of the model’s
head, if there is a bend in an arm, on what angle the hips tilt, etc.
Remember, this sketch should be very simple, and your model should relax
as soon as you finish it.
4. Fill out the details of your stick figure.
5. Outline your figure drawing carefully and add clothes. You can erase
your inside guidelines and colour in your person.
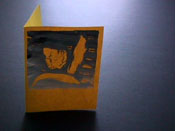
 Make your
own sketchbook Make your
own sketchbook
Materials:
· Cardstock or equally strong material for your book cover
· Paper cut to size (amount depends on how many pages you want in your
book)
· Five thin nails
· Scrap of wood to protect top of your worktable
 Directions: Directions:
1. Cut pages and book cover to size and fold in half.
2. Punch five holes through the middle fold.
3. Guide your needle, thread through the third (middle) hole, and weave
down through the second hole, and up to the first hole.
4. Weave back through the remaining holes to the fifth (last hole) and
then sew your way to the third hole again.
5. Pull thread tightly and knot with the other end of thread.
6. Cut off leftover thread and you should have a neat, strong binding.
This is a one-signature book.
Monoprinting
 Unlike other
forms of printing that Christopher Pratt practices (etching and lithography)
monoprinting is a means of producing a single print of an image.
It involves no complicated process and little equipment is required. Unlike other
forms of printing that Christopher Pratt practices (etching and lithography)
monoprinting is a means of producing a single print of an image.
It involves no complicated process and little equipment is required.
Materials:
· Tempera paint any colours
· Paintbrushes of varying widths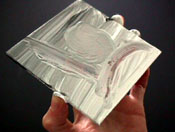
· Plexi-glass plates cut to any size
· Drawing utensils (sticks, q-tips, rag, sponge)
· Rag and cup for water for cleaning brushes
 Directions: Directions:
1. Cover plexi-glass plate with an even layer of tempera paint
2. Draw in this layer with finger, brush, etc. or wipe away paint with
rag or sponge.
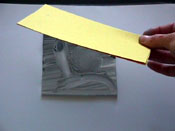
3. Carefully press a sheet of paper down on to the plate and rub gently with the
back of fingers. Do not press too hard and squash the image.
 4. Lift paper
when you have rubbed the whole image area. The print will be a reverse
of the original image on the plexi-glass plate. You will notice that if
you did not spell your name or a word backwards on the plate, it will
be backwards on your paper print. 4. Lift paper
when you have rubbed the whole image area. The print will be a reverse
of the original image on the plexi-glass plate. You will notice that if
you did not spell your name or a word backwards on the plate, it will
be backwards on your paper print.
Simple Egg Tempera Emulsion
Egg tempera emulsion is a permanent paint with an opaque finish. It is water-soluble
so you can use water to thin your emulsion and to clean your brushes.
This emulsion is very useful when you want to paint one colour over another.
Try not to be wasteful - mix as much pigment as you will be using at one
time. However, the emulsion will keep for a few days if you store it in
an airtight jar in the refrigerator.
 Materials: Materials:
· Assorted powdered pigments or poster colours
How to make it:
1. Place the egg yolks in a measuring cup and break the yolks. Determine
the amount of water you will need by dividing in half the measurement
of your egg yolks. The relation is 2 to 1 which means, if you have 2 tablespoons
of egg yolk, you will need one tablespoon of water.
2. Do not beat but mix egg yolks and water thoroughly until well blended.
3. Mix a small amount of egg mixture with each powdered pigment. Work
with brush in a palette pan until thoroughly mixed.
return to You Try
return to Age 15-17+
|


